Sheet metal · Lesson 11
Convert to Sheet Metal and Insert Bends
Not every sheet metal part starts as a base flange. Convert to Sheet Metal turns a solid — your own or an imported STEP file — into sheet metal by picking a fixed face and the edges to bend; SOLIDWORKS adds the rips. Insert Bends does the same for shelled bodies with uniform walls, and Rip opens closed corners so the part can unfold.
 Kevin Walsh
Where to find it
Sheet Metal tab → Convert to Sheet Metal; Insert Bends; Rip
Options
| Option | Use |
|---|---|
| Fixed entity | Face that stays put when flattening |
| Bend edges / Collect all bends | Edges that become bends |
| Rip edges | Found automatically; gap set per rip |
| Rip sketch | Linear sketch where an edge cannot bend |
| Reverse thickness | Material inside or outside the solid |
| Keep body | Keeps the original solid (multibody parts) |
| Show callouts | Double-click a callout to change one gap or radius |
| Corner defaults | Open butt, overlap or underlap |
Insert Bends and Rip
Insert Bends works on shelled or imported bodies with uniform walls: cylindrical faces become rolled bends, sharp edges become bends with your radius, and rips can be added in the same command. Rip cuts a gap along an edge before Insert Bends. Shell is the usual way to make the starting body. For imported files, see STEP files.
Step by step
-
1
Model a simple solid
Sketch a 100 × 60 rectangle and extrude it 30 mm. Shell it 2 mm, removing the top face — an open box with sharp inside corners.
-
2
Start Convert to Sheet Metal
Convert to Sheet Metal. Enter thickness 2 and bend radius 2. Pick the bottom face as the fixed entity.
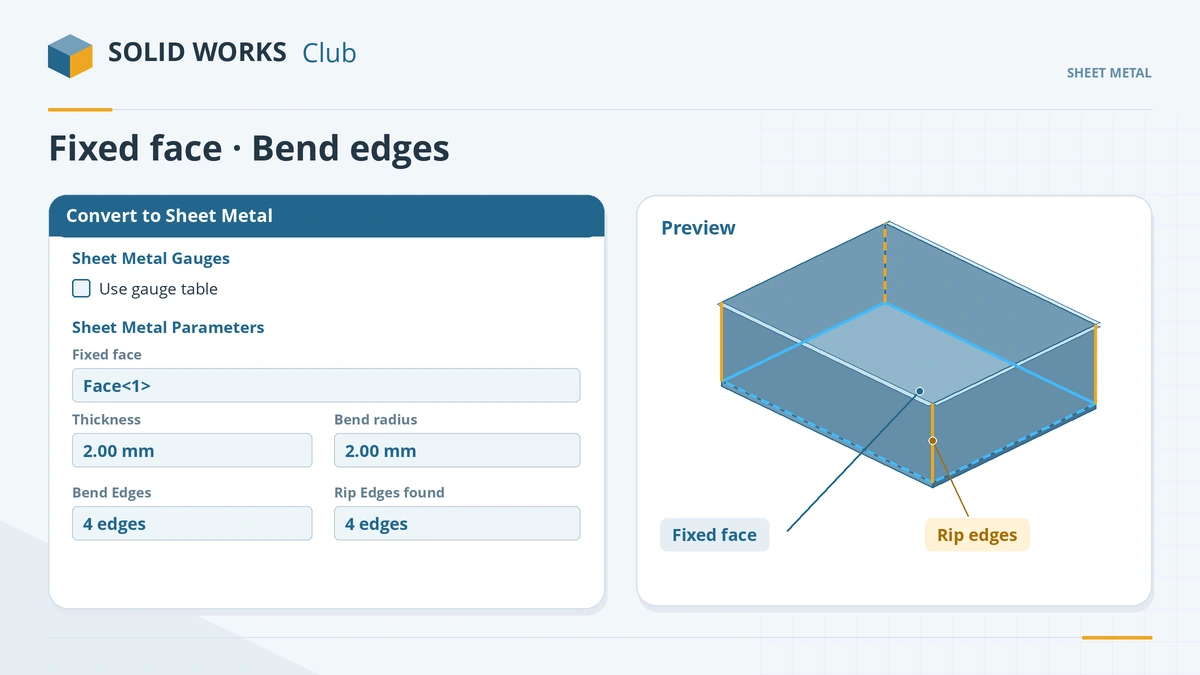
Pick a fixed face and the bend edges; rips are added automatically. -
3
Pick the bend edges
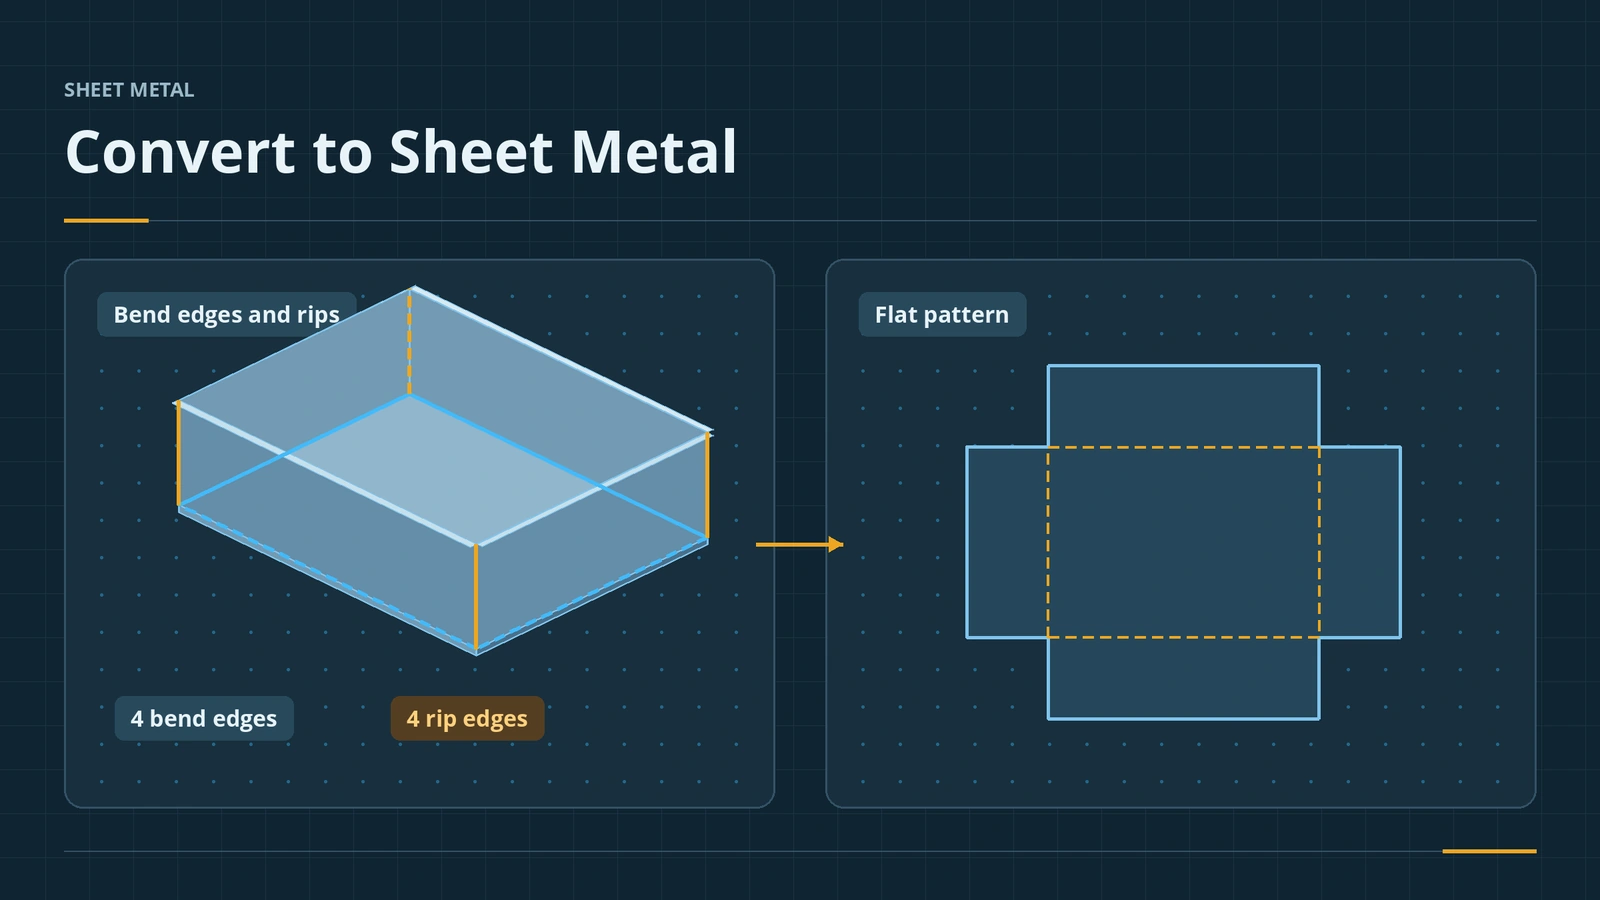
Pick the four bottom edges, starting next to the fixed face. The four vertical corners become rip edges automatically. Check the callouts and click the tick.
-
4
Flatten
Flatten: the box opens into a cross-shaped blank. The tree now has a Sheet-Metal folder, a Convert-Solid feature and a Flat-Pattern.
Common mistakes
- A badly chosen fixed face — it decides how the flat pattern lies.
- Picking bend edges in random order — start next to the fixed face so rips fill correctly.
- Imported IGES parts that refuse to unfold — import STEP or Parasolid and run Import Diagnostics first.
- Rips on filleted or curved edges — rips work best on straight edges.
Lesson 11 of 13 in the sheet metal course.
Practice
Convert the shelled 100 × 60 × 30 box with four bend edges. Check: the cut list shows Bends: 4 and Sheet Metal Thickness: 2, and Flatten gives one cross-shaped blank with four rips at the corners.
Sources
- TriMech — Convert to Sheet Metal feature (Jul 2016)
- SolidProfessor — How to convert to sheet metal (Nov 2018)
- GoEngineer — Convert to Sheet Metal vs Insert Bends (Jan 2026)
- Solid Solutions — Importing sheet metal, part 1 (Sep 2018)
- Solid Solutions — Importing sheet metal, part 2 (Sep 2018)
- Solid Solutions — Convert to Sheet Metal (Jul 2013)
- Javelin — How to flatten a dumb solid (Apr 2016)
- SOLIDWORKS Tech Blog — Part Reviewer: imported sheet metal
- GoEngineer — SOLIDWORKS 2024 sheet metal updates (Nov 2023)
- Solid Solutions — Sheet metal tools in SOLIDWORKS 2024 (Nov 2023)
- GoEngineer — Cut list properties: where do they come from? (Dec 2020)
Checked November 2026. SOLID WORKS Club is independent; menu names can differ slightly between releases.
Frequently asked questions
How do I convert a solid to sheet metal in SOLIDWORKS?
+
Use Convert to Sheet Metal on the Sheet Metal tab: set thickness and radius, pick a fixed face and the bend edges; rip edges are added automatically.
What is the difference between Convert to Sheet Metal and Insert Bends?
+
Convert to Sheet Metal sets its own thickness from your input. Insert Bends takes the thickness from a shelled or imported body with uniform walls.
How do I flatten an imported STEP part?
+
Import with diagnostics and heal the faces, then use Convert to Sheet Metal or Insert Bends. STEP and Parasolid work better than IGES.
How do I flatten a cylinder or cone?
+
Since SOLIDWORKS 2024, the Rip feature can cut the gap a cylinder or cone needs; then use Insert Bends.
Related
- SOLIDWORKS ShellHow to use Shell in SOLIDWORKS to hollow a part: faces to remove, wall thickness, shell outward, multi-thickness walls, and what to do when the shell fails.
- Flat patterns in SOLIDWORKS sheet metalHow the SOLIDWORKS flat pattern works: Flatten, Flat-Pattern options, Unfold and Fold for cuts across bends, bend lines and flat drawing views.
- Sheet metal cornersFinish SOLIDWORKS sheet metal corners: Closed Corner butt, overlap and underlap, Break Corner fillets and chamfers, Corner Relief and Welded Corner.
- How to export SOLIDWORKS to STEPHow to save a SOLIDWORKS part or assembly as STEP, which AP version to choose (AP203, AP214, AP242), exporting components separately, and pitfalls.