Weldments · Lesson 6
Weldment cut lists
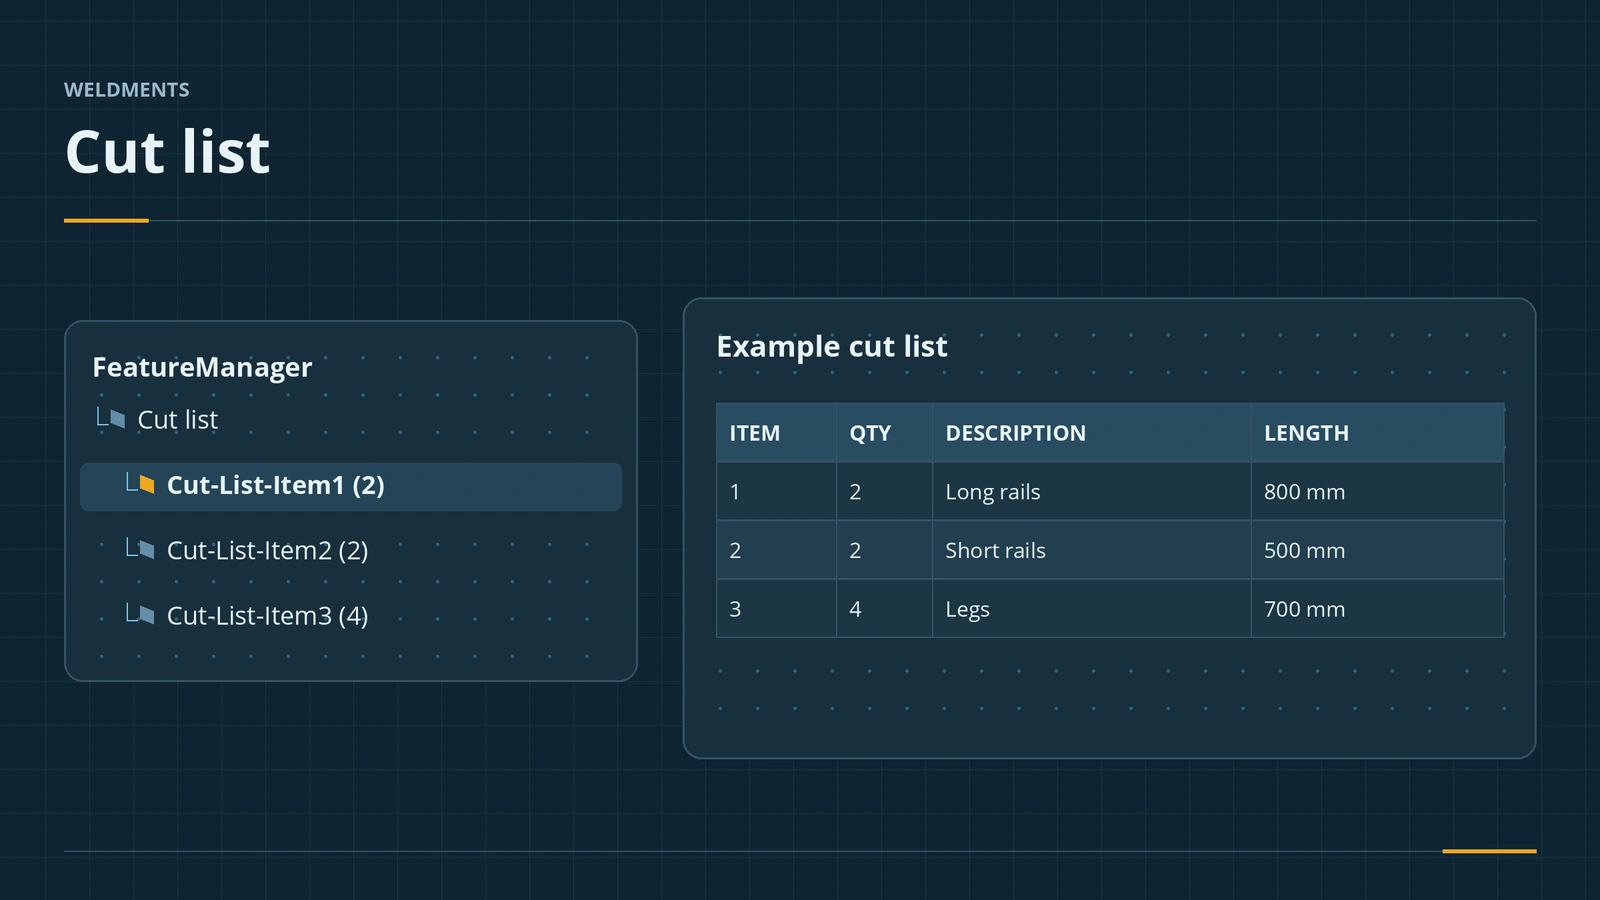
A weldment's cut list replaces the Solid Bodies folder. SOLIDWORKS groups identical bodies into cut list items and gives structural members properties such as Length, angles, material and quantity. In a drawing, a Weldment Cut List table turns them into the cutting list the workshop uses.
 Kevin Walsh
Where to find it
FeatureManager → Cut list folder; right-click an item → Properties; drawing: Insert → Tables → Weldment Cut List
Cut list settings
| Setting | Where / since |
|---|---|
| Automatically create and update cut lists | Document Properties → Weldments (on by default) |
| Rename folders with Description | Document Properties → Weldments |
| Collect identical bodies, faces/features to exclude | Right-click Cut list → Sorting Options (2017+) |
| Bounding box and custom description | Right-click item → Create Bounding Box (description customisable since 2018) |
| Per-configuration properties | Since 2019 |
| Cut list IDs | Document Properties → Weldments → Generate Cut list IDs (2021+) |
Length is the normal distance between the end faces; Total Length sums items of the same profile, material and size. Drawing tables in general are covered in BOM and balloons.
Practise it: read the tube lengths from the cut list of the chair project.
Step by step
-
1
Open the cut list
In the finished table frame, expand Cut list. Each folder is a cut list item: identical bodies are collected, with the count in brackets.
-
2
Read the properties
Right-click a member item → Properties. The Cut-List Properties dialog shows Length, Angle1, Angle2, Material, Quantity and more.
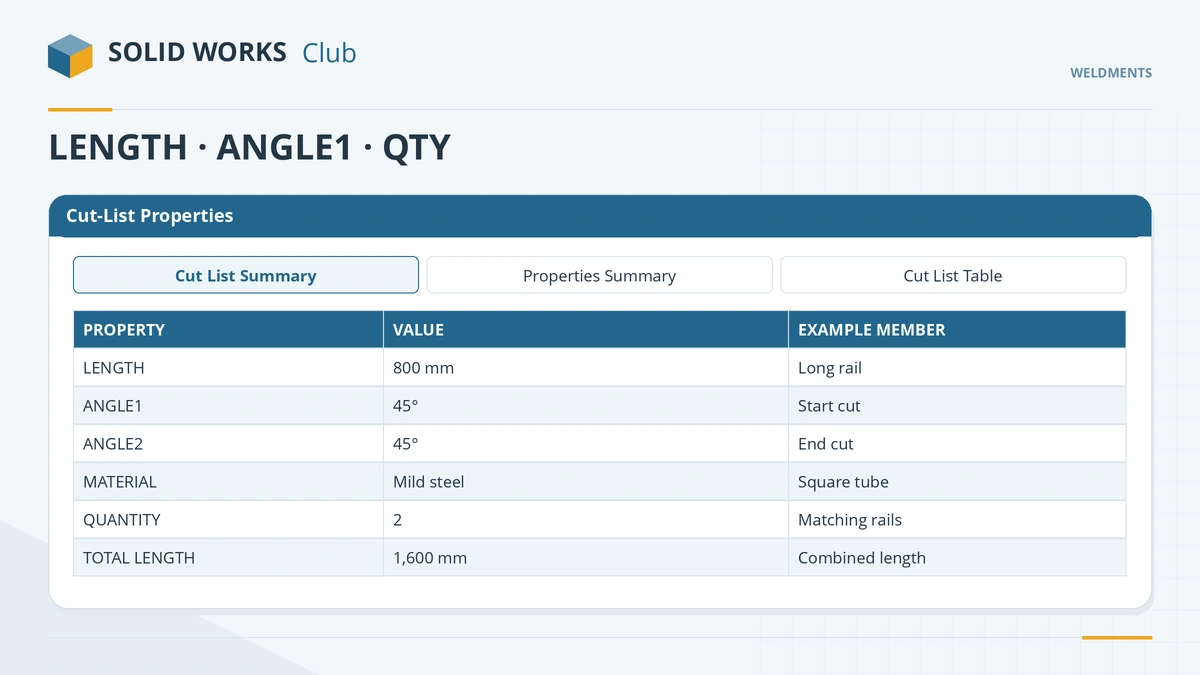
Structural members get length, angles, material and quantity automatically. -
3
Add bounding boxes for plates
Right-click the gusset and end cap items → Create Bounding Box. They get thickness, width, length and a description.
-
4
Put it on a drawing
In a drawing of the frame, select a view → Insert → Tables → Weldment Cut List. The default template is cut list.sldwldtbt.
Common mistakes
- No Cut list folder — set Solid Bodies to Automatic in System Options → FeatureManager.
- Bodies that differ slightly (a hole in another place, a different material) do not group.
- Comparing the drawing table with the As Machined configuration — the table follows the default (As Welded) state.
Lesson 6 of 7 in the weldments course.
Practice
Open the cut list of the finished frame (rails, legs, cross member, one gusset, end caps). Check: the item quantities add up to the body count — 2 + 2 + 4 + 1 + 1 + 4 = 14 bodies — and each member item shows a Length.
Sources
- GoEngineer — Missing cut list folder in the FeatureManager tree (Dec 2018)
- Dassault Systèmes — Working with Weldments, SolidPractices (rev. May 2025)
- Engineers Rule — A beginner's guide to SOLIDWORKS weldments (May 2016)
- CATI — Weldments from profiles to cut lists, part 4 (Mar 2014)
- Engineers Rule — Weldments: how to use them and create your own (Dec 2025)
- GoEngineer — Cut list properties: where do they come from? (Dec 2020)
- Javelin — Collect Identical Bodies and the cut list (Dec 2024)
- Javelin — 2018 weldments bounding box description (Dec 2017)
- Javelin — Descriptions for end caps and gussets in cut list tables (Apr 2026)
- Javelin — 2019 configuring cut lists for configurations (Dec 2018)
- Javelin — 2021 weldment cut list IDs (Oct 2020)
- GoEngineer — Create a custom weldment cut list template (Mar 2020)
- SolidProfessor — 2026: access cut list properties from File Properties (Jan 2026)
Checked November 2026. SOLID WORKS Club is independent; menu names can differ slightly between releases.
Frequently asked questions
How do I update a weldment cut list?
+
It updates automatically by default. For large weldments you can turn that off in Document Properties → Weldments and right-click → Update.
What cut list properties do structural members get?
+
Eight system properties: Length, Angle1, Angle2, Angle Direction, Angle Rotation, Material, Quantity and Total Length.
How do I add a cut list table to a drawing?
+
Select a view of the weldment and use Insert → Tables → Weldment Cut List.
Can I use cut list properties in a title block?
+
Since SOLIDWORKS 2026 cut list properties can be linked from File Properties into notes and title blocks.
Related
- Structural Member — your first weldment frameBuild a SOLIDWORKS weldment frame with Structural Member: layout sketch, standard, type and size, groups, corner treatment, trim order and locating the profile.
- BOM and balloons in assembly drawingsHow to add a BOM table and balloons to a SOLIDWORKS assembly drawing: insert the BOM, anchor it, Auto Balloon, stacked balloons and magnetic lines.
- Weld beads in SOLIDWORKS weldmentsAdd welds to SOLIDWORKS weldments: Weld Bead with Smart Weld Selection, bead size and weld symbols, the Weld Folder and weld tables, vs Fillet Bead.
- SOLIDWORKS bill of materials (BOM)How to create a bill of materials in SOLIDWORKS: top-level, parts-only and indented BOMs, part numbers, custom columns, sorting, templates and balloons.